
What should you check before adjusting cupboard doors?
Start with the fixings and the hinge model. Adjustment can improve the position of a securely attached door; it cannot restore the grip of a screw in a damaged hole. This guide covers adjustable concealed hinges, with a round cup recessed into the door and an arm attached inside the cupboard.
Open the door and inspect both the cup and the cabinet mounting plate. Gently support the free edge and look for movement at either fixing. Secure any loose fixing screws with a correctly fitting hand screwdriver, without overtightening. Wickes' fitting guide warns that overtightening can damage the unit. If a screw spins without gripping, stop and assess the fixing.
Find the hinge's name or code and match it to its instructions. IKEA's levelling advice points to the assembly diagram for the correct screws. Do not assume every visible screw is an adjuster.
Which adjustment does the cupboard door need?
Look at the closed door before turning anything. Compare its top edge, the gap beside it and how far its face projects from the cabinet. Many concealed hinges offer height, side and depth movement, as shown in Blum's adjustment overview. Use the symptom to choose what to check first.
Scroll across to see all columns.
| What you see | First check |
|---|---|
| Door is level but too high or low | Height adjustment at the mounting plates. |
| Gap is too wide or narrow along its length | Side adjustment across the hinges. |
| Gap tapers from top to bottom | Fixings first, then side adjustment to correct the tilt. |
| One edge stands forward | Obstructions first, then depth adjustment. |
| Hinge moves away from the wood | Fixing repair before any alignment. |
Take a straight-on photo before starting. It gives you a reference if an adjustment improves one gap but worsens another.
How do you adjust kitchen cupboard doors step by step?
Work on one door and one direction at a time. If several corrections are needed, establish the height, even up the side gaps, then check the depth. Skip adjustments that already look right. Screw positions and turning directions vary, so use the diagram for your hinge rather than a generic clockwise rule.
- Set the height. Support the door's weight. Some mounting plates use a height-adjustment cam; others require their fixing screws to be loosened slightly so the plate can slide. Use the specified method on each hinge, align the top edge, and retighten any released fixings before letting go. Do not remove the screws.
- Even up the side gaps. Make a small turn of the identified side adjuster, close the door and observe the change. To move the whole door sideways, work across its hinges. To correct a tapered gap, adjust the end that is out of line and recheck the opposite end.
- Check the depth. Use the identified depth control to move the door towards or away from the cabinet. Check the hinge edge has clearance and the closed face aligns with neighbouring fronts. Retighten any locking screw that your hinge's instructions require.
The difference between mechanisms matters: Blum CLIP top BLUMOTION uses a spiral depth adjuster and offers cam-height plates, while the fittings in Wickes' example use a loosen, move and retighten method. Never force an adjuster beyond its travel.
What if the cupboard door still will not close?
Check where the door stops before making another adjustment. A door that meets a shelf, an internal drawer, stored contents or a neighbouring handle needs that obstruction addressed. If its edge touches another front, review the side gap. If it binds near the hinge, review the depth and the hinge instructions.
Close it slowly while watching the point of contact. Do not push through the resistance. Open neighbouring doors and internal drawers in their normal sequence, then check the affected door again. A tidy gap while everything is shut is only part of a successful adjustment. If the drawer itself stops short or sits crooked, use the drawer closing checks rather than adjusting the cupboard door to hide that fault.
Soft-close controls affect damping, not door alignment. Blum's hinge instructions cover damping separately from positional adjustment. If the door sits correctly but its closing action remains faulty, identify the hinge and check its mechanism rather than repeatedly changing the gaps.
When does a cupboard hinge need repair instead?
A fixing needs attention when the mounting plate pulls away, a screw will not grip, or the board around the hinge is cracked or crumbling. A bent hinge or loose hinge joint also needs assessment. Turning adjustment screws cannot repair these faults. Check swollen or distorted board separately before trying to correct the fit at the hinges.
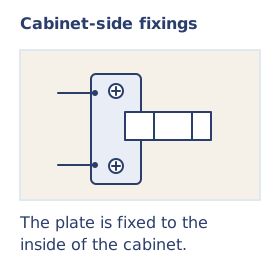
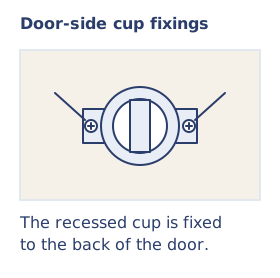
A compatible repair plate may provide a way to restore a damaged fixing. Howdens supplies a cabinet hinge repair kit; its fitting sheet distinguishes door-side and cabinet-side assembly and their fixing requirements. Suitability depends on the hinge arrangement and the condition of the surrounding board; a kit is not a universal answer to extensive damage.
Scroll across to see all columns.
| What has failed? | What to establish | Repair to assess |
|---|---|---|
| Loose screw, intact board | Whether the correct fixing grips and the hinge stays secure | Secure the fixing, then check alignment; stop if it spins |
| Damaged cabinet-side hole | Mounting-plate layout, board thickness and sound material around the damage | A compatible cabinet-side repair or replacement panel |
| Damaged door-side cup fixing | Cup size, fixing positions, door thickness and damage around the recess | A compatible door-side repair; a cabinet mounting plate is not automatically suitable |
| Bent arm or worn hinge joint | Hinge identification, opening angle and inset or overlay arrangement | Matching hardware replacement rather than more positional adjustment |
| Swollen or crumbling panel | Extent and cause of material damage | Assess the panel and cause first; a plate cannot make unsound board sound |
Before buying a plate, photograph the whole hinge, its cup in the door and its cabinet mounting plate. Include the damaged area and an undamaged hinge if available. Compare the proposed kit's hole pattern, thickness and specified fixings with those details. Do not fill a torn hinge hole with ordinary decorating filler and assume it can carry the door.
For help with a loose hinge or damaged cupboard, see my home repair service and areas covered. Send the details below through my contact options so we can establish what needs attention.
Sources used in this guide
Tell me which cupboard door needs attention.
Send your postcode, the number of affected doors, a photo with the doors closed and a close-up of each affected hinge and fixing. Include the kitchen or hinge brand if known, where the door catches, and whether a screw spins or the hinge pulls away.
Home repairs enquiries are welcome from Kingston, Richmond and Merton.
Message me on WhatsApp